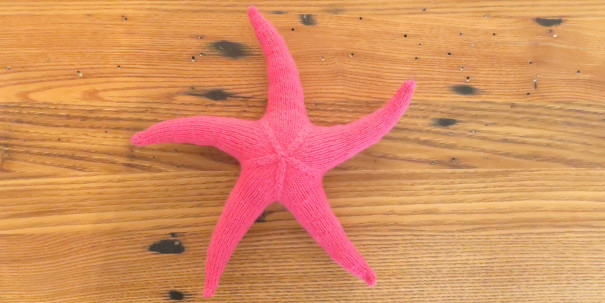
When I decided to make things you’d see at the beach for the last Iron Craft challenge I knew I wanted to make a starfish. I figured I just use the pattern I wrote for stars two Christmases ago, but as a started I realized I just didn’t want to do all that seaming. Was there a way to do this? Why yes, there was.
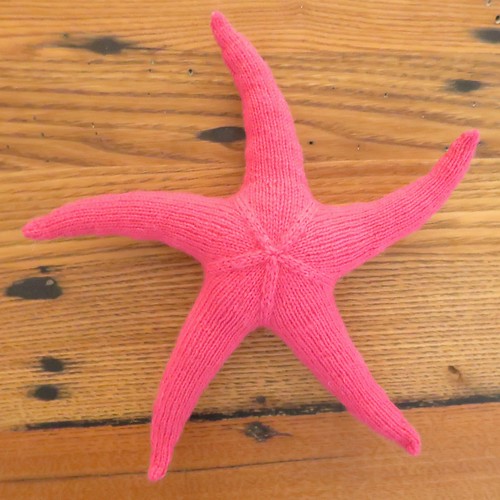
Basically, you knit the legs in the round, keeping the end stitches live. Then you knit the top stitches and bottom stitches of each leg to the others to create the body, stuffing it as you go. Don’t worry, I walk you through it all. It is a little tricky at the beginning of each leg, knitting only six stitches in the round, but it gets easier quickly. Plus I found it got easier with each leg.
My starfish is knit with fingering weight yarn and about 9 inches across. I can see it being done in a bulky weight for a fun starfish pillow. Or add a face to the top of the body before you knit the back for a starfish toy. Heck, add some green floral shorts and you’ve got Patrick from Spongebob.
Seamless Knit Starfish
I used knit stitches for the top of the starfish and purl stitches for the bottom to give it more of a defined top and bottom like a real starfish.
Download a pdf of the Starfish Pattern with How-To Pics or the Starfish Pattern without How-To Pics
Supplies:
- about 75 yards yard of choice (I used Knit Picks Palette in Fuschia)
- four double-pointed needles in size appropriate to get a tight gauge with your yarn (I used size 0)
- stitch marker
- scrap yarn
- tapestry needle
- stuffing
Gauge: Gauge is not important to this project, you just want to make sure it is tight enough that the stuffing doesn’t show through. My gauge was about 9 stitches per inch and my final starfish is 9” across. More stitches per inch and you will have a small starfish, less stitches per inch and you will have a larger one.
Abbreviations:
- K – knit
- P – purl
- M1r – make one stitch left
- M1l – make one stitch right
- Pfb – purl into the same stitch front and back increasing one stitch
- K2tog – knit two stitches together
- Ssk – slip two stitches and knit them together
- P2tog – purl two stitches together
Legs:
Cast on 6 stitches and divide between three needles. Join to knit in the round being careful not to twist. Place a stitch marker between the first and last stitch to mark rows.
Rows 1 – 3: k3, p3
Row 4: m1l, k3, mlr, pfb, p1, pfb (10 stitches)
Rows 5 – 9: k5, p5
Row 10: m1l, k5, m1r, pfb, p3, pfb (14 stitches)
Rows 11 – 17: k7, p7
Row 18: m1l, k7, m1r, pfb, p5, pfb (18 stitches)
Rows 19 – 27: k9, p9
Row 28: m1l, k9, m1r, pfb, p7, pfb (22 stitches)
Rows 29 – 39: k11, p11
Row 40: m1l, k11, m1r, pfb, p9, pfb (26 stitches)
Rows 41 – 51: k13, p13
Row 52: m1l, k13, m1r, pfb, p11, pfb (30 stitches)
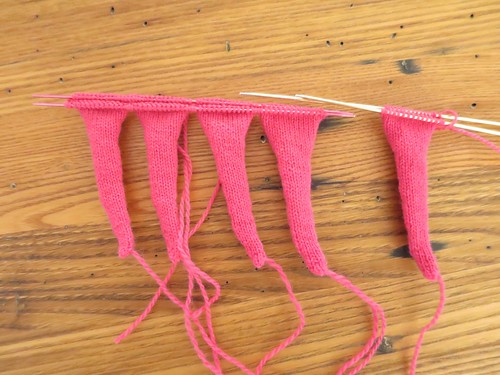
You will now have one leg. Place the 15 knit stitches on a piece of scrap yarn or extra needle and the 15 stitches on another. Cut from yarn leaving about a 6” tail. (Except for the last leg, leave it on the ball to start the body.)
Make 4 more legs the same way. This is what you will end up with.
Body:
Put the 75 knit stitches on three needles, 25 per needles. Put all the purl stitches on a long piece of scrap yarn.
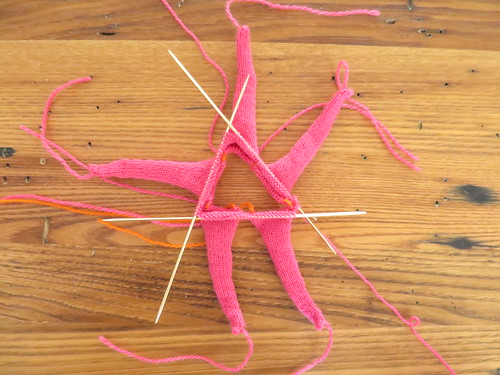
You will now only be working with the knit stitches. Join the knit stitches on the three needles to work in the round with a stitch marker marking the first and last stitch. Make your first stitch the one where the yarn is still attached to the leg.
Rows 1 – 2: k
Row 3: (ssk, k11, k2tog)5x (65 stitches)
Rows 4 -5: k
Row 6: (ssk, k9, k2tog)5x (55 stitches)
Rows 7 – 8: k
Row 9: (ssk, k7, k2tog)5x (45 stitches)
Row 10 – 11: k
Row 12: (ssk, k5, k2tog)5x (35 stitches)
Row 13: k
Row 14: (ssk, k3, k2tog)5x (25 stitches)
Row 15: k
Row 16: (ssk, k1, k2tog)5x (15 stitches)
Cut the yarn leaving about a 10 inch tail. Weave the tail through the remaining stitches and take them off the needles. Pull the yarn inside and close the hole. Weave in the ends.
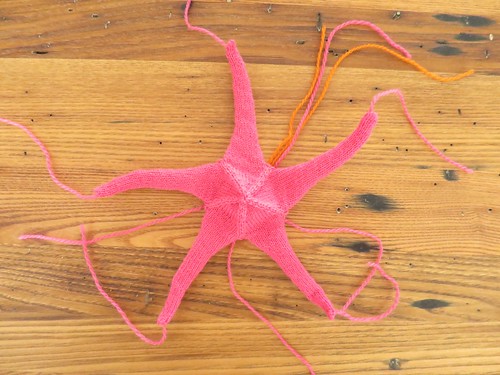
Now turn the work over so the purl side is facing you.
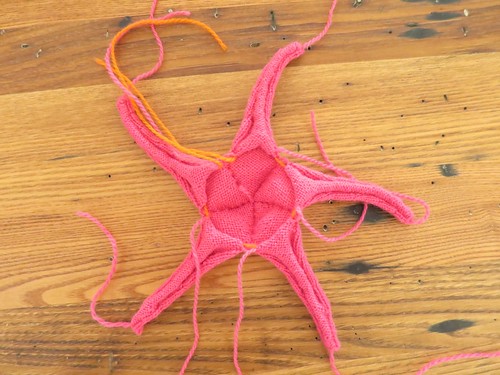
Stuff the legs. Don’t stuff them so high up that the stuffing will get in the way of your knitting the bottom.
Put the 75 purl stitches on three needles, 25 per needles. Join in the round placing a stitch marker between the first and last stitch. Make the first stitch the one that doesn’t have a tail attached to it
Row 1 – 2: p
Row 3: (p2tog, p11, p2tog)5x (65 stitches)
Row 4 – 5: p
Use the tails from the legs to close up the holes between them. Leave the tails inside the body.
Row 6: (p2tog p9, p2tog)5x (55 stitches)
Row 7: p
Row 8: (p2tog, p7, p2tog)5x (45 stitches)
Row 9: p
Row 10: (p2tog, p5, p2tog)5x (35 stitches)
Row 11: p
Row 12: (p2tog, p3, p2tog)5x (25 stitches)
Row 13: p
Stuff the body and top of the legs.
Row 14: (p2tog, p1, p2tog)5x (15 stitches)
Row 15: p
Add anymore stuffing you need. Cut the yarn leaving about a 10 inch tail. Weave the tail through the remaining stitches and take them off the needles. Pull tight to close the hole. Weave in the ends.
Copyright 2014 Kathy Lewinski JustCraftyEnough.com
Do not copy for distribution, repost, sell or teach without permission
© 2005 – 2014 Kathy Lewinski & Susan Cornish



Pingback: Top Knitting And Crochet Inspiration for May 30, 2014 at Hands Occupied
Pingback: 18 Amazing DIY Beach Inspired Decorations for Your Home |DIYManiac
Pingback: Knit a Fun Starfish for Summer | Knitting | CraftGossip.com
Pingback: 12 beach wedding ideas and DIYs - Mollie Makes
Pingback: Part 2: Have a Whale of a Time: Knitting Patterns Inspired by Finding Dory and Finding Nemo - Knitting for Charity
Pingback: 5 Μοτίβα πλεξίματος Amigurumi Starfish - Poncil