This is the fifth in our series to help get you ready for the 12 Days of Christmas Mitten Garland Knit Along. Today we will be talking about stranded color work. I have to be upfront with you guys, this is not an easy thing to write about because we all knit differently and I can really only show how I do it. So, I’m going to talk about what I know and give you some links with more info and videos.
Basically, stranded color work is a way of working two (or more) colors in a row where you strand or float the color that is not being worked behind your knitting until you need it again. Things people struggle with in stranded knitting are how to hold their yarn, catch long floats, keep gauge, and prevent peek through.
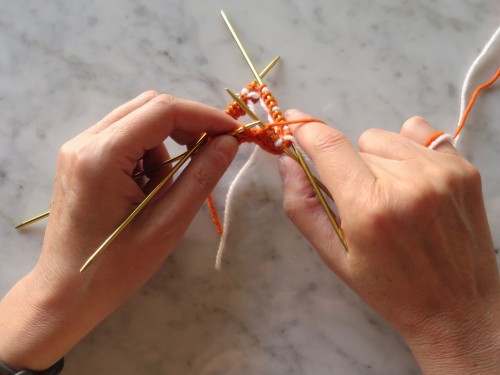
How you hold your yarn is really a personal choice and often has a lot to do with how you knit regularly. I am a thrower and hold my yarn in what I call fishing reel fashion, wrapped around my pinkie. When I do color work, I hold both yarns in my right hand, wrapped around the pinkie. The yarns are secured to my hand by my last two or three fingers.

The color I am working with goes over my index finger while the other color hangs underneath (though it is still secured to my hand). When I want to switch colors, I drop the one I am working and bring the other one to the top of my index finger.
Other people like to hold their yarn in both hands and other people hold both in their left hand. None of these ways are wrong. Just find the way that is comfortable for you. Here is a post on Craftsy explaining the different ways. Here is a video and photo tutorial on Knit Picks showing ways to hold your yarn, work color work and catch floats.
When you are switch from one color to another, you can either bring the new color over or under the previous one to knitting position. I used to always bring the new color from underneath. This meant neither color was dominate in my knitting and that my yarns got very twisted. Now I pick a color to be dominate in my pattern. I always bring that color under the other color and the non-dominate color I bring over. This makes the stitches of the dominate color slightly bigger (and bonus you get less twisting). I wrote a little more about it here. I didn’t used to believe in yarn dominance until I did that test myself. Don’t get too caught up in this if you are just learning color work though.
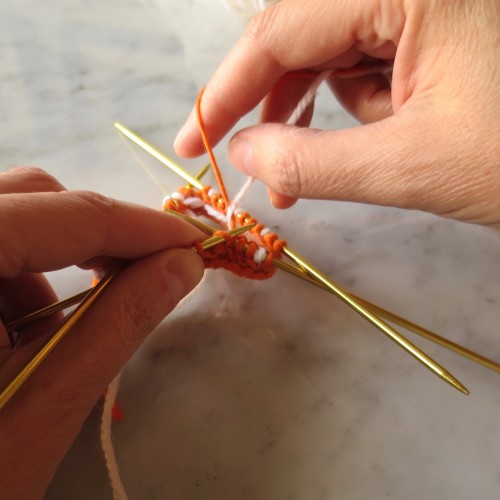
Sometimes, you have a long break between changing colors which will give you a long float or strand of the unused color behind your work. You don’t want to let your floats get too long, especially if you are making an item that is going to be worn. I like to keep my floats to 1/2″ or less, the number of stitches this is depends on your gauge. What you do is secure the unused yarn behind your knitting from time to time. You do this by bringing the unused color between your knitting and your working color, basically catching it behind a stitch.

In this picture, I am using the orange yarn and catching the white yarn. With our little mittens for the KAL, we do have some areas where you will have longer floats because of the pictorial style of the color work, but because no one will be wearing these, you can leave your floats longer than you normally would.
I think keeping gauge is the trickiest part of color work. Most people knit tighter when doing it and often end up with puckers. The main problem is they are pulling their floats too tight. Remember that float needs to be the same length as the stitches it is behind, if you pull it tight it will pull those stitches in causing a pucker. It helps to keep the stitches on your right needle spaced out and not pushed together. Some people like to knit their color work in the round inside out. You work with your right side on the inside of your work which means your wrong side is slightly larger and keeps your floats longer. Here is a video on that technique. Even after years of color work, I still get a little puckering, but it is so slight that blocking really gets rid of it. Blocking will be your color works best friend. As with anything else, it takes practice to get it just right.
Finally, the dreaded peek through. This is were you can see the color that is stranded behind in places you aren’t supposed to. This can be caused by a couple of different things. If you are getting lots of peek through all over, you may be knitting at too loose a gauge for color work with your selected yarn. Your weave needs to be tight enough that you can’t see through it. The other common place for peek through is where you catch floats. Make sure that you aren’t making the stitch where you are doing the catch looser than those around it. (This is a problem I have.) Don’t stack your catches, make sure you are staggering where you catch floats from row to row. Don’t catch a float in a place were you will be doing an increase on the next row. With our mittens, this is very important at the thumb gusset. If you do a catch where you will do a make one on the next row, you will see the catch.
There has been a lot of discussion in the Ravelry group about other techniques to secure the yarn at the back to prevent the peek through, here are the links to those suggested techniques so you don’t have to search through the discussion, It’s Not About the Hat and Jacquard (Invisible) Floats. I have not tried these, but have seen things done like this is person and it creates beautiful work. Some people who have tried it worry it might be a bit fussy for our small mittens.
Ok, this was a lot of words! There are a lot of great tutorials on line and I’ve only linked to one or two, so if you are still having a hard time spend some time looking around. Also feel free to ask questions here and on the group.
© 2005 – 2016 Kathy Lewinski & Susan Cornish


2 Comments to 12 Days KAL: Stranded Color Work