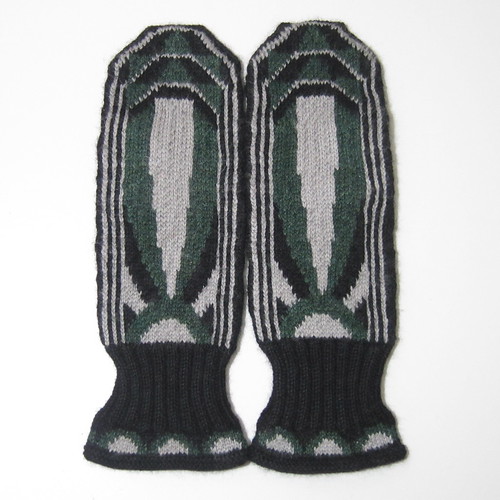
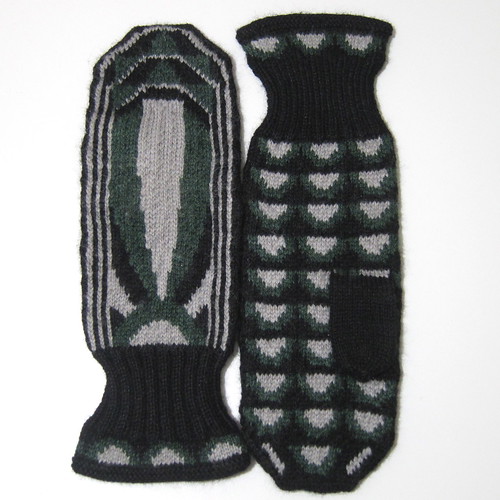
Some of you may remember earlier this year I gave away a pair of custom designed mittens, well I finally finished them!

The winner, Beth, asked me to design something with an art deco design in black, silver and jade green. I think these fit the bill.

I will admit to you that these mittens were a challenge for me. I am comfortable knitting with two colors, but three took me a little (read that as a lot) more time. (Actually, most of the extra time was spent untwisting the colors.) I feel a lot more confident about using more than two colors in a row now. If you are looking to challenge your knitting skills as far as colorwork, I highly recommend giving these a try.
Art Deco Mittens
This pattern makes a pair of mittens that are 7.5″ (19.05 cm) long (not including the cuff) and 8″ (20.32 cm) around.
Download the full Art Deco Mittens Pattern or just the Art Deco Mitten Chart.
Supplies:
- 1 ball each fingering weight yarn in black, grey and green, about 220 yards each (I used Knit Picks Gloss in black, robot and jade. I used most of the black and about 2/3 of the grey and the green.)
Tools:
- four size 1 (2.25 mm) double pointed needles (or size needed to get gauge)
- stitch marker
- scrap contrasting fingering yarn
- tapestry needle
Gauge: 9 stitches and 11 rows per inch
Required Skills:
- knitting and purling in the round on four needles
- basic increases and decreases
- reading a color chart
- stranded color knitting with three colors
- kitchner stitch seaming
- picking up stitches
Abbreviations:
- k – knit
- p – purl
- kfb – knit front and back – knit into the same stitch twice, once into the front and once into the back. Increases one stitch.
- ssk – slip, slip, knit – sip two stitches as if to knit. Put them back on the left needle and knit them together. Decreases one stitch.
- k2tog – knit two together – knit two stitches together. Decreases one stitch.
Cuff:
With the black yarn, cast on 72 stitches. Divide between three needles. Join to knit in the round being careful not to twist the stitches. Place a stitch marker between the last and first stitch to mark rows.
Row 1: k
Row 2: p
Row 3: k
Row 4: p
Row 5 – 6: k
Row 7 – 14: Work cuff chart
Row 15: k2, p2 until end of row
Repeat row 15 for desired length. My cuffs are 3″ (7.62 cm) long.
Last cuff row: k35, kfb, k35, kfb (74 stitches)
Hand:
Note about thumb placement: I have placed the thumb at 3″ (7.62 cm). I recommend trying on your mittens or measuring your hand to place the thumb exactly where you want it.
Rows 1 – 33: work hand chart
Row 34: Other than the 11 stitches you knit onto the scrap yarn, you will still be working the hand chart.
(right hand) k2, k11 onto scrap yarn, slip those 11 stitches back onto the left needle, k until end of row
(left hand) k24, k11 onto scrap yarn, slip those 11 stitches back onto the left needle, k until end of row.
Rows 35 – 71: continue working chart.
Decreases:
Keep working chart while doing decreases. You will be decreasing 4 stitches per row.
Row 72: ssk, k33, k2tog, ssk, k33, k2tog
Row 73: ssk, k31, k2tog, ssk, k31, k2tog
Row 74: ssk, k29, k2tog, ssk, k29, k2tog
Row 75: ssk, k27, k2tog, ssk, k27, k2tog
Row 76: ssk, k25, k2tog, ssk, k25, k2tog
Row 77: ssk, k23, k2tog, ssk, k23, k2tog
Row 78: ssk, k21, k2tog, ssk, k21, k2tog
Row 79: ssk, k19, k2tog, ssk, k19, k2tog
Row 80: ssk, k17, k2tog, ssk, k17, k2tog
Row 81: ssk, k15, k2tog, ssk, k15, k2tog
Row 82: ssk, k13, k2tog, ssk, k13, k2tog (30 stitches)
Cut yarn leaving about a 12″ (30 cm) tail. Seam using the kitchner stitch.
Thumb:
Carefully removed the scrap yarn putting the stitches on two needles, one for the top stitches and one for the bottom stitches. You should have 11 stitches on each needle.
With the black yarn, knit the bottom stitches, pick up two stitches, knit the top stitches, pick up two stitches (26 stitches). Place stitch marker. Divide the stitches between three needles (I like to do this as I’m knitting this round.)
Knit in the round until about 1/4″ (6.35 mm) from the top of the thumb.
Decreases:
Row 1: k2tog 13 times (13 stitches)
Row 2: k
Row 3: k2tog 6 times, k (7 stitches)
Row 4: K2tog 3 times, k (4 stitches)
Cut the yarn leaving about a 6″ (15.25 cm) tail. Put the tail on a tapestry needle and weave through remaining stitches. Pull tail inside the mitten and pull the stitches tight.
Weave in all ends.
Copyright 2013 Kathy Lewinski
JustCraftyEnough.com
For personal use only. Do not duplicate for distribution, repost, sell or teach without permission.
© 2005 – 2013 Kathy Lewinski & Susan Cornish


WOW! These are just beautiful.
Yes, I agree with Kim – those mittens are beautiful. I love the colors! You did such a wonderful job!
Pingback: Art Deco Mittens to Knit | Knitting | CraftGossip.com