The current Iron Craft challenge was hosted by Russ of NY Star Cards and he asked us to create a craft inspired by a country other than our own. I decided to head to France and make something inspired by the famous Breton Stripe.
I’m sure you have all seen the classic Breton stripe top. In 1858, these navy and white tops were made part of the official uniform for the French Navy. Apparently sometime in the early 1900’s, Coco Chanel visited the French coast and took a liking to these tops introducing them into her 1917 nautical collection.
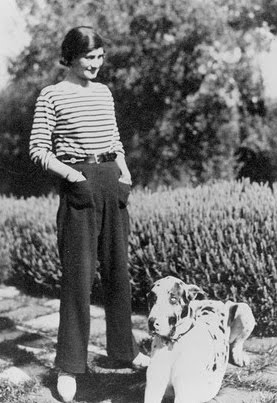

The shirt has since been popular with celebrities throughout the years, Marilyn Monroe, Pablo Picasso, Brigitte Bardot, Andy Warhol, Edie Sedgwick, Jean-Paul Gaultier, Audrey Hepburn, James Dean and Jean Seberg. It continues to be a symbol of chic French fashion and has been adapted by many different designers.
I decided to work that classic stripe into some accessories, a cap and handwarmers. Today, I’ll share the cap with you and later in the week the handwarmers.
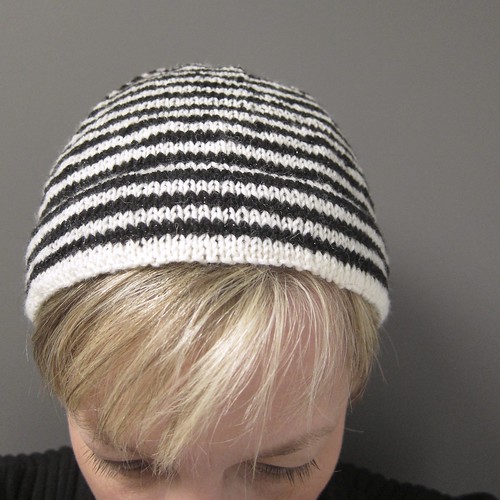
Even though the calendar says it’s Spring, where I live it is still relatively cold. (We are currently under a winter storm warning and could get up to 11 inches over the next three days.) I like to think of this cap as a spring cap. It is made from fingering weight yarn, so it isn’t very heavy. It is also shorter than a lot of hats, just covering the delicate tip of the ears. It’s the perfect sort of thing to pull on when those Spring breezes feel a little more like November winds.

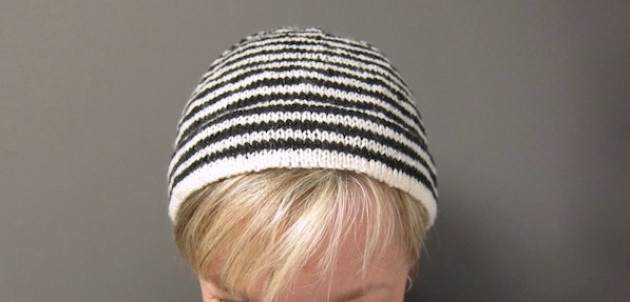
A few notes on the construction of this hat. The shape of the hat is pretty basic, but dressed up with a hemmed brim and of course, the stripes. I like the neat look of a hemmed brim. I made mine rather long, 1 1/2″, so that is would give the look of a wider cuff. I went with black instead of the classic navy for my stripes. On top of that, the black yarn I used has a thin shiny strand running through it that just catches the light, it gives it that little touch of je ne sais quoi.
Breton Stripe Cap
Download the Breton Stripe Cap Pattern
Notes on this pattern:
This makes a short cap that just covers the top of the ears. For a long, more hat-like version, work more rows straight before starting the decreases for the crown.
The stripes in the cap are worked in the round, which can cause a step or jog where you switch colors at the beginning of a row. See my directions on how to do a stepless stripe here.
Supplies:
- white or ecru fingering or sock weight yarn, about 100 yards (I used Red Heart Heart and Sole)
- black or navy blue fingering or sock weight yarn, about 100 yards (I used King Merinos Lamé which is technically a sport weight)
Tools:
- 4 or 5 size 2 (2.75mm) double-pointed needles (or size needed to get gauge)
- 16″ size 2 circular needle (optional) (or size needed to get gauge)
- stitch marker
- tapestry needle
Gauge: 7 stitches and 9 row in 1 inch
Required Skills:
- knitting and purling in the round on four needles
- picking up stitches
- basic decreases
Size: 22″ (approx. 66cm)
Cast on 154 with the ecru or white yarn. You can do this on a circular needle or 5 double-points. Switch over to 4 double-points when the hat gets too small. Join in the round being careful not to twist stitches. Place a stitch marker between the last and first stitch.
Knit for 1 1/2 inches.
Purl one row.
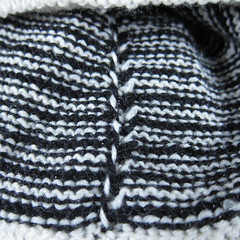
Knit another 1 1/2 inches this time changing color every two rows. (Make sure to use the stepless stripe technique on the second row of each color.) Don’t bother cutting the yarn when you change colors, since you are only going up two rows just twist the colors when you change by bringing the new color up underneath the old. Here’s what it will look like on the inside.
Weave in the end where you started the black or blue yarn.
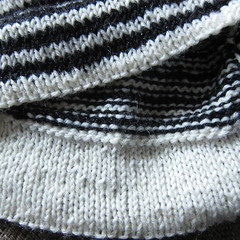
Fold the first 1 1/2 inches inside the hat at the purl row. On the next row, pick up the corresponding cast on stitch with each stitch on the needle and knit them together. Here’s what it will look like on the inside.
Continue working in knit stripes for another 1 1/2 inches.
Decreases:
Row 1: k5, k2tog (repeat until end of row) (132 stitches)
Row 2 -4: k
Row 5: k20, k2tog (repeat until end of row) (126 stitches)
Row 6 – 7: k
Row 8: k19, k2tog (repeat until end of row) (120 stitches)
Row 9 – 10: k
Row 11: k18, k2tog (repeat until end of row) (114 stitches)
Row 12 – 13: k
Row 14: k17, k2tog (repeat until end of row) (108 stitches)
Row 15 – 16: k
Row 17: k16, k2tog (repeat until end of row) (102 stitches)
Row 18 – 19: k
Row 20: k15, k2tog (repeat until end of row) (96 stitches)
Row 21 – 22: k
Row 23: k14, k2tog (repeat until end of row) (90 stitches)
Row 24: k
Row 25: k13, k2tog (repeat until the end of row) (84 stitches)
Row 26: k
Row 27: k12, k2tog (repeat until the end of row) (78 stitches)
Row 28: k
Row 29: k11, k2tog (repeat until the end of row) (72 stitches)
Row 30: k
Row 31: k10, k2tog (repeat until the end of row) (66 stitches)
Row 32: k9, k2tog (repeat until the end of row) (60 stitches)
Row 33: k8, k2tog (repeat until the end of row) (54 stitches)
Row 34: k7, k2tog (repeat until the end of row) (48 stitches)
Row 35: k6, k2tog (repeat until the end of row) (42 stitches)
Row 36: k5, k2tog (repeat until the end of row) (36 stitches)
Row 37: k4, k2tog (repeat until the end of row) (30 stitches)
Row 38: k3, k2tog (repeat until the end of row) (24 stitches)
Row 39: k2, k2tog (repeat until the end of row) (18 stitches)
Row 40: k1, k2tog (repeat until the end of row) (12 stitches)
Row 41: k2tog (repeat until the end of row) (6 stitches)
Cut yarn leaving about a 6″ tail. Put the tail on a tapestry needle and weave through the six remaining stitches. Pull tail to the inside of the hat and pull the stitches tight. Weave in all remaining ends.
Copyright 2013 Kathy Lewinski JustCraftyEnough.com
Do not duplicate for distribution, repost, sell or teach without permission.
© 2005 – 2013 Kathy Lewinski & Susan Cornish



Another fantastic project. Well done.
Nice! I like the shiny strand through the black.
Also, I haven’t been able to add photos to the group flickr site yet. I’m excited to see everyone’s projects!
Silly me! I’ve fixed it now. No wonder I had trouble adding to the group when I wasn’t even adding it the right group!
Excellent design and very chic product. You always have such fantastic projects!
Pingback: Free Pattern for a Breton Striped Hat · Knitting | CraftGossip.com
Pingback: Бретонская полосатая шляпа | Вязание спицами и крючком