This week for Iron Craft Susi asked us to make something for a kid. As much as I wanted to start something new, I knew I wouldn’t have time with the craft fair this weekend. So hopefully, you’ll all give me a little by week since I finished something I had already started instead.
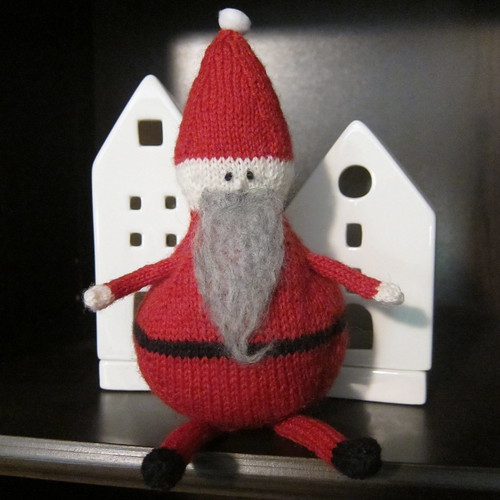
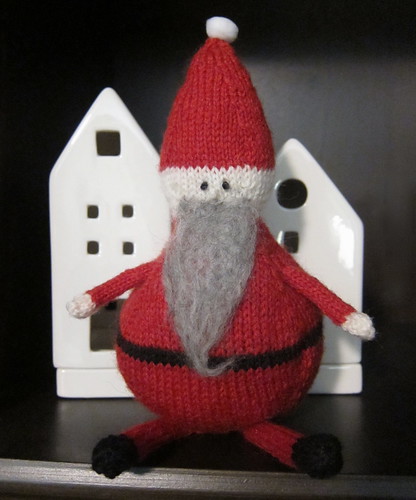
 I’ve been picturing this little santa doll for while. With his roly-poly body and spindly little arms and legs, he’s perfect for hugging. Other than the first couple of rows, this is a pretty simple knit and if you are handy with double points you can knit him up in an evening or two.
Roly-Poly Santa Doll
- Sock weight yarn in red, cream and black
- Four size 3 double pointed needles
- Polyfil
- Tapestry needle
- Grey roving (optional)
- Needle felting needle (optional)
- Small white pom-pom (optional)
Gauge:
8 stitches per inch. Gauge isn’t super important here since it doesn’t need fit anyone. My santa is 7″ tall not including the legs. If you have a less stitches per inch, your santa will be bigger. If you have a more stitches per inch, your santa will be small.
Abbreviations:
- k – knit
- kfb – knit into the front and back of the same stitch
- ssk – slip two stitches as to purl and then knit them together
- k2tog – knit two stitches together
Body:
You will be knitting your santa from the bottom up.
With the red cast on 6 stitches. Divide between 3 needles. Join in the round without twisting stitches. Place a marker between the last and first stitch.
Row 1: kfb, kfb, kfb, kfb, kfb, kfb (12 stitches)
Row 2: k
Row 3: kfb, kfb, kfb, kfb, kfb, kfb, k6 (18 stitches)
Row 4: k
Row 5: kfb, k1, kfb, k1, kfb, k2, kfb, k1, kfb, k1, kfb, k6 (24 stitches)
Row 6: k
Row 7: kfb, k2, kfb, k2, kfb, k4, kfb, k2, kfb, k2, kfb, k6 (30 stitches)
Row 8: k
Row 9: kfb, k3, kfb, k3, kfb, k6, kfb, k3, kfb, k3, kfb, k6 (36 stitches)
Row 10: k
Row 11: kfb, k4, kfb, k4, kfb, k8, kfb, k4, kfb, k4, kfb, k6 (42 stitches)
Row 12: k
Row 13: kfb, k5, kfb, k5, kfb, k10, kfb, k5, kfb, k5, kfb, k6 (48 stitches)
Row 14: k
Row 15: kfb, k6, kfb, k6, kfb, k12, kfb, k6, kfb, k6, kfb, k6 (54 stitches)
Row 16: k
Row 17: kfb, k7, kfb, k7, kfb, k14, kfb, k7, kfb, k7, kfb, k6 (60 stitches)
Row 18: k
Row 19: kfb, k8, kfb, k8, kfb, k16, kfb, k8, kfb, k8, kfb, k6 (66 stitches)
Row 20: k
Row 21: kfb, k9, kfb, k9, kfb, k18, kfb, k9, kfb, k9, kfb, k6 (72 stitches)
Row 22: k
Row 23: kfb, k10, kfb, k10, kfb, k20, kfb, k10, kfb, k10, kfb, k6 (78 stitches)
Row 24: k
Row 25: kfb, k11, kfb, k11, kfb, k22, kfb, k11, kfb, k11, kfb, k6 (84 stitches)
Row 26: k
Row 27: kfb, k12, kfb, k12, kfb, k24, kfb, k12, kfb, k12, kfb, k6 (90 stitches)
Change to black
Row 28 – 29: k
Change to red
Row 30: k
Row 31: ssk, k12, ssk, k12, ssk, k24, k2tog, k12, k2tog, k12, k2tog, k6 (84 stitches)
Row 32: k
Row 33: ssk, k11, ssk, k11, ssk, k22, k2tog, k11, k2tog, k11, k2tog, k6 (78 stitches)
Row 34: k
Row 35: ssk, k10, ssk, k10, ssk, k20, k2tog, k10, k2tog, k10, k2tog, k6 (72 stitches)
Row 36: k
Row 37: ssk, k9, ssk, k9, ssk, k18, k2tog, k9, k2tog, k9, k2tog, k6 (66 stitches)
Row 38: k
Row 39: ssk, k8, ssk, k8, ssk, k16, k2tog, k8, k2tog, k8, k2tog, k6 (60 stitches)
Row 40: k
Row 41: ssk, k7, ssk, k7, ssk, k14, k2tog, k7, k2tog, k7, k2tog, k6 (54 stitches)
Row 42: k
Row 43: ssk, k6, ssk, k6, ssk, k12, k2tog, k6, k2tog, k6, k2tog, k6 (48 stitches)
Row 44: k
Row 45: ssk, k5, ssk, k5, ssk, k10, k2tog, k5, k2tog, k5, k2tog, k6 (42 stitches)
Row 46: k
Row 47: ssk, k4, ssk, k4, ssk, k8, k2tog, k4, k2tog, k4, k2tog, k6 (36 stitches)
Row 48: k
Row 49: ssk, k3, ssk, k3, ssk, k6, k2tog, k3, k2tog, k3, k2tog, k6 (30 stitches)
Row 50: k
Row 51: ssk, k2, ssk, k2, ssk, k4, k2tog, k2, k2tog, k2, k2tog, k6 (24 stitches)
Row 52: k
Stuff the body into a firm sphere.
Change to cream yarn.
Row 53-54: k
Row 55: kfb, k2, kfb, k2, kfb, k4, kfb, k2, kfb, k2, kfb, k6 (30 stitches)
Row 56: k
Row 57: kfb, k3, kfb, k3, kfb, k6, kfb, k3, kfb, k3, kfb, k6 (36 stitches)
Row 58: k
Row 59: kfb, k4, kfb, k4, kfb, k8, kfb, k4, kfb, k4, kfb, k6 (42 stitches)
Row 60-62: k
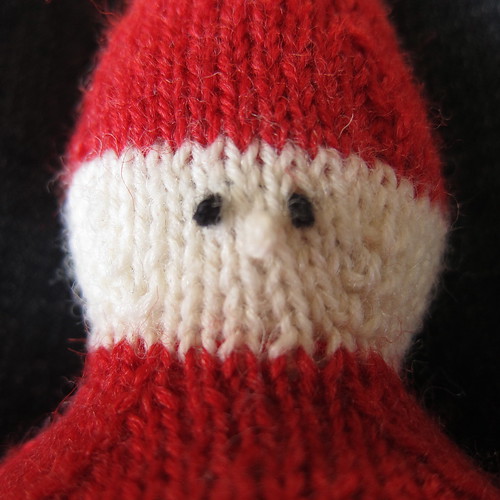
Embroider eyes and nose on for face. I used french knots for both. There is a front and back to your santa. The back is the strip of 6 knit stitches.

Change to red
Row 63: k
Row 64: kfb, k5, kfb, k5, kfb, k10, kfb, k5, kfb, k5, kfb, k6 (48 stitches)
Row 65-67: k
Row 68: ssk, k5, ssk, k5, ssk, k10, k2tog, k5, k2tog, k5, k2tog, k6 (42 stitches)
Row 69-71: k
Row 72: ssk, k4, ssk, k4, ssk, k8, k2tog, k4, k2tog, k4, k2tog, k6 (36 stitches)
Row 73-75: k
Row 76: ssk, k3, ssk, k3, ssk, k6, k2tog, k3, k2tog, k3, k2tog, k6 (30 stitches)
Stuff the head and then continue stuffing the hat as you go.
Row 77-79: k
Row 80: ssk, k2, ssk, k2, ssk, k4, k2tog, k2, k2tog, k2, k2tog, k6 (24 stitches)
Row 81-83: k
Row 84: ssk, k1, ssk, k1, ssk, k2, k2tog, k1, k2tog, k1, k2tog, k6 (18 stitches)
Row 85-87: k
Row 88: ssk, ssk, ssk, k2tog, k2tog, k2tog, k6 (12 stitches)
Row 89: k
Row 90: ssk, ssk, k2tog, k2tog, k2tog, ssk (6 stitches)
Cut the thread leaving about a 6 inch tail. Put the tail on a tapestry needle and weave through the remaining stitches. Pull tight. Stick inside the center top of the head & pull through to a side. Duplicate stitch over a stitch and pull through the stuffing again. Cut off.
Arms – Make 2:
Cast on 6 stitches in red and work an icord for about 1 1/2 inches.
Change to cream, continue to work as an icord following the pattern below.
Row 1: k
Row 2: k1, kfb, k1, kfb, k1, kfb (9 stitches)
Row 3: k
Row 4: k1, k2tog, k1, k2tog, k1, k2tog (6 stitches)
Row 5: k2tog, k2tog, k2tog
Cut the yarn leaving about a 4 – 5 inch tail. Using the tapestry needle weave the tail back through the stitches on the needle. Pull tight. Weave in end.
Legs – Make 2:
Cast on 8 stitches in red and work an icord for about 2 inches.
Change to black and continue the icord for another 1/2 inch.
Increase for the boot toe in the following manner while still working as an icord.
Row 1: kfb 8 times (16 stitches)
Row 2: k
Row 3: k2tog 8 times (8 stitches)
Cut the yarn leaving about a 4 – 5 inch tail. Using the tapestry needle weave the tail back through the stitches on the needle. Pull tight. Weave in end.
Finishing:
Sew the arms to either side of the body. Lightly stuff the legs with a little polyfil. A knitting needle helps push the fill in to the toe. Sew the legs underneath the body. I planned on having my doll sit all the time, so I sewed the legs flat underneath him. If you plan on him being a doll you may want to sew them straight down. Sew the pom-pom, if using, to the top of the hat.
I needle felted on a beard using grey roving. It wouldn’t stand up to a lot of love, so if your santa is going to be a toy you may want to sew yarn or felt on as a beard.
If you knit up a santa we’d love to see them it our Flickr group!
If you find any mistakes in this pattern please let me know so they can be corrected.
copyright 2011 Kathy Lewinski
www.justcraftyenough.com
Do not sell or duplicate this pattern. Do not sell items made with this pattern. Do not teach this pattern without my permission. Thank you.
© 2005 – 2011 Kathy Lewinski & Susan Cornish


He’s adorable! 🙂
Pingback: Navidades 2012 II « La Maison Bisoux
Pingback: Christmas 2012 / Noël 2012 II |